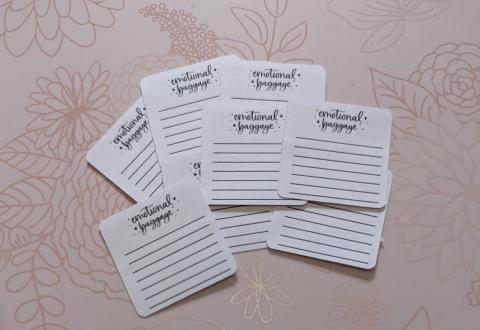
Recenty I have gotten back into writing down my emotional breakdowns and my feelings to see what triggers me and track them. I wanted to create a little sticker to write my feelings on and then place it where there is space, making it a little more fun and pretty. I can write tiny so I was able to make them smaller to fit in little spaces. Every once in while I place in between two dates because my feelings kind of overlap. It’s just a fun way to deal with my anxiety and to try to make me feel a little better.
I might make others by changing little things but sure what just yet. My goal is to create and release a line of mental health planner/notebook stickers. What I have created so far needs some reworking to get them ready for purchase. I would eventually like to do precut stickers for anyone who doesn’t have a machine to cut out and a cutable version for those who have a machine to cut them. It is a big work in progress.
Materials
- Sticker paper - writeable. I used mailing label sheets from Staples
- Printer - inkjet or laser
- Cricut Design Space
- Cricut machine - Maker or Explore Air 2
- Premium fine-point blade
- Green standard mat or blue light grip mat - whichever one you have
- Brayer to help adhere the paper to the mat
- Image - either created in Design Space or from another program
- Pen and notebook or planner to put it in
How to create
Making the image
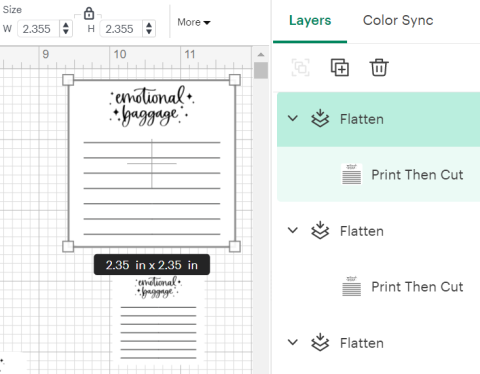
- Open Cricut Design Space.
- Go to “shapes” and select the square with the rounded corners or desired shape. Make a size that is easier for you to work with. You can shrink it later.
- Go to “images” and type in "emotional baggage" or desired saying. Or go to “text” and make your own.
- Place the "image" or "text" on top of the square. If the text is behind the square, go to “arrange” and send it to the front, and it should now be on top of the square.
- Highlight the square and the wording, then go to “align” and “center vertically” the wording.
- Once the word is centred, group the square and the wording together. I do this to make sure it stays where I want it to while adding the lines.
- Go to “images” and search “line” and pick the one you want or go to “shapes” and select the “score line” and then go to “operations” and change it to “draw.”
- Flip the line horizontally by rotating the line 90 degrees under “more,” and place it over top of the box and place it where you want.
- Then go to “align” and “center horizontally” You can use the up and down arrow keys on your keyboard to move the line if needed.
- Duplicate the line as many times as needed. You will have to align them.
- Highlight all the lines, then go to “align” and either choose “left or right” This will ensure the lines are all lined up.
- With the lines still highlight, go back to “align” and go to “distribute vertically” This will make the spacing between the lines the same.
- Group all the lines together. This is optional, but I do it so there aren't so many small images.
- Once grouped highlight both group images and then go to "align" and "center" the lines. Use the up and down arrows to move the line grouping if needed.
- Once you are happy with everything, go down to the bottom right-hand corner and flatten the image. It should now say print and cut.
- Make the image as big or small as you need, and duplicate it as needed.
Printing and cutting
- Turn on the printer and Cricut.
- Place the sticker paper into the printer.
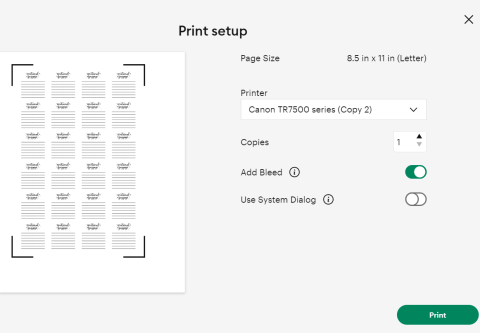
- Go to “make it,” and a screen will pop up with how the images are placed; then click “continue”
- Choose the “for any material” mat option and then click continue
- Next screen, click “send to printer.”
- The print screen will pop up and ensure the bleed option is on, and click “print.”
- Let the paper dry if needed (optional)
- Place the printed sheet on the mat, then run the brayer over the sheet to adhere it to the mat.
- Set material to the printable vinyl setting; this will not cut all the through you peel them off like a sticker sheet.
- Load the mat into the machine when the “arrow” starts flashing
- Click the “C” when it starts flashing
Removing stickers from the mat
- Unload the machine when prompted by the flashing “arrow”
- Flip the mat over and peel the mat off the sticker paper and take your time if you need to use the spatula to help peel.
Use these in your everyday planner or you can use these to create a personal mental health planner that works just for you.
If you have any questions, comments or looking to purchase your own pop it in the box below I would love to hear from you!
Add new comment