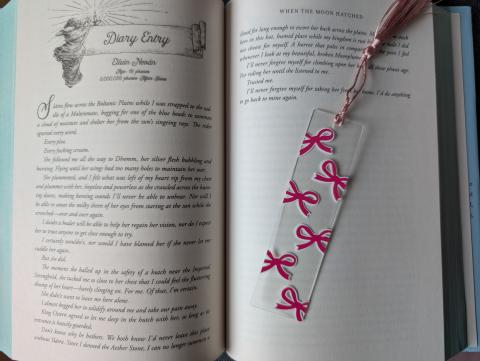
Bows are a big trend this year, and they make super cute projects. I wasn’t sure how the bookmark was going to turn out once I started working on it, but it turned out super cute, and I can’t wait to make more!
There are so many options for making bow bookmarks. They can be done in different colours and different styles of bows. You can mix and match to make the bookmark match your style!
Materials
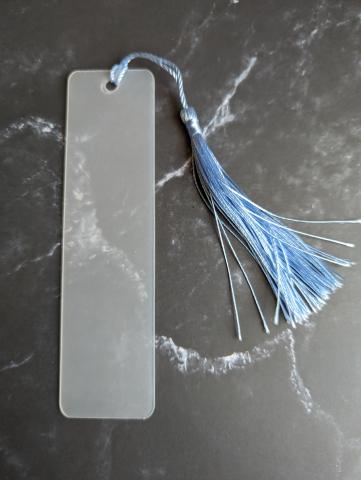
- Acrylic bookmark blank
- Pink vinyl for the bow - or the desired colour
- White vinyl for the offset, or the desired colour
- Cricut Design Space
- Cricut machine - I used the Joy
- Fine point premium blade
- Green mat
- Brayer to help adhere the vinyl to the mat
- Weeding pen
- Transfer tape
- Scraping tool
- Scissors
- Alcohol wipes - help clean any dirt & oils off
- Self-healing mat*
- Exacto knife*
- Tape to hold the bookmark to the self-healing mat*
- Tassel or ribbon
- Embellishments (optional)
*Not all of these are necessary; grid to help keep the bookmark straight & a surface to cut the extra vinyl off if necessary.
How to create
Making the design
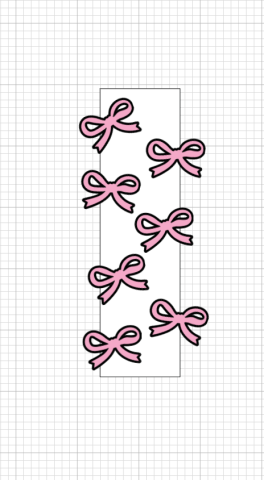
- Open Cricut Design Space and open up a new project.
- Go to shapes, add a rectangle and adjust the size you are working with. This is just to help with space and sizing.
- Go to images and search “bow”, then add the image you want to work with.
- Move the bow over the rectangle and adjust it to your desired size.
- Duplicate as many times as you need. If some bows hang off the edge, you may need to adjust the size and placement. Play with it until you are happy.
- Adjust the colours if needed.
When you cut the images and add them to the bookmark, they might not line up the same way as they are on screen.
Cutting images
- Go to make when ready to cut the images.
- Add the vinyl to the mat(s) and use the brayer to help adhere it to the mat.
- Pick the mat for “any material” and click “confirm”.
- Click “continue” when you are ready to start the cut.
- I pick the material I use, either small letters or premium vinyl. I have some custom settings, so I sometimes use that one.
- Load the mat into the machine when the light starts blinking and when prompted in Design Space.
- When prompted, click “go” to start the cut.
- Click “unload” when the cut is done.
- Repeat as needed for each colour or image: for example, bow and offset.
You can either attach the images to have them cut the way you have them set up, or leave them and just individually add the images to the bookmark.
Weeding the images
- Flip the mat over and peel the vinyl off the mat.
- Take the weeding pen or tool and remove the vinyl you don’t need.
- Cut the access vinyl if you feel like it is getting in your way.*
- Repeat as needed.
*This part isn’t necessary, I do it to make it easier and cleaner when weeding.
Adding the images
- Remove the plastic protective layer.
- Add a piece of tape on the back of the bookmark and line it up with the lines on the self-healing mat.*
- Take the alcohol wipe and clean off the bookmark to help remove dirt and oils.
- Cut the bows and offsets into individual pieces. This gave me more control over the placement.
- Cut a piece of transfer tape to the size you need.
- Add the transfer tape and peel the backing off.
- Now, place the image on the bookmark blank. The image doesn’t have to be fully on the blank; you can have it hang off and remove the access
- Repeat as needed until you have the bookmark covered.
*This doesn’t need to be done, but I always do it to keep it from moving and keep it straight if needed.
Removing the extra vinyl
- Set the self-healing mat up so you can cut on it.
- Flip the bookmark over so the side with the vinyl is facing down.
- Take the Exacto knife and cut off any extra vinyl hanging off the edge.
Adding the tassel or other embellishments
- Remove the protective covering if you haven’t already.
- Thread through the tassel, string or ribbon and embellishments.
If you want for the backing, you can paint or even add another piece of vinyl to add a little something extra.